Creating an open kitchen, dining and living area.
Renovating a south facing apartment and using simple and modest initiatives to improve daylight, views, ventilation and flow.
Describe the before
The kitchen was a divided corner of the living area. There were 2 solid walls, with a small opening to enter the kitchen. The kitchen blocked light into the living area, creating dark corners with stale air.

before: view of kitchen
The kitchen itself was a tight C shaped configuration with a high number of corners to bench length. This meant that storage was difficult to access, and the cooking activities were internalised from the dining area. There was limited area to store a fridge, and the previous owner instead had their fridge in the dining area.

before: view of kitchen

before: view of dining room with fridge outside of kitchen
Why did you decide to make a change
The apartment had some good aspects that were hindered by the current layout. The updated kitchen was the main catalyst to make it happen. The apartment was south facing, but had daylight on 3 sides. The kitchen occupied a key eastern edge that blocked light deep into the living area.
The apartment lacked storage, leading to miscellaneous items cluttering the home.
The appliances needed an update, and the cupboards needed replacement. The kitchen needed a rethink to make it useful for hospitality and entertaining.
Describe the process: How long did it take? How much did it cost? Did you bring in outside help? Any setbacks or surprises?
Process
As the project was in an apartment building and involved wall demolition (non load bearing), engineers advice was sought. This information along with the builders CV was then forwarded to the strata for review.
The project had a builder who managed all the trades to come in sequence. The builder worked on commercial sites in the day, and came to this side project in the afternoons. The builder had access to commercial level trades which lifted the quality of the build.
The process included demolition, rough in, making good of walls, joinery and painting and installation of fixtures and fittings.

construction shots showing demolition of brick walls and installation of beams

Costs
The project cost approximately 55k and provided a positive outcome in terms of layout, functionality, storage and flexibility.
Initially, the opening to the kitchen was full height. There was a saving in lowering the height of the opening to align with the adjacent joinery, leaving the cornices untouched. The beams were within the width of the existing wall and were rendered over.
The island bench was fairly economical. At the time IKEA had a standard stainless steel high table. The benchtop was sourced from a timber yard. The finishing and installation was done by the owner.
The were savings in the client sourcing their own materials and supplies. This was coordinated with the builder in terms of loading and storage. This saved the double up in GST and the builders margin.
There were savings in asking for trade discounts for the carpet, tiles, dishwasher, oven, lights, sink and tap.
Even if you don’t have access to trade discounts, most items have seasonal sale every few months which is similar to the trade discount.
There were savings also with the stove which was bought as a refurbished model from grays online at $400 when brand new was $3k.
Setbacks and surprises
The build was a relatively smooth and quick process. The builder was in control of the trades. There was nothing in the build which was a surprise to him. Where there was ambiguity in the design drawings, the builder communicated directly with the owner for quick resolution.
For smaller projects, care and consideration is required in the location of every small item, to maximise the use of the space.
What do you love about the “after”? What would you do differently?

3d’s of new kitchen

after: plan of kitchen

after: elevation of kitchen
after: elevation of kitchen

after: elevations of living room joinery
Brighter for both the kitchen, dining and living area
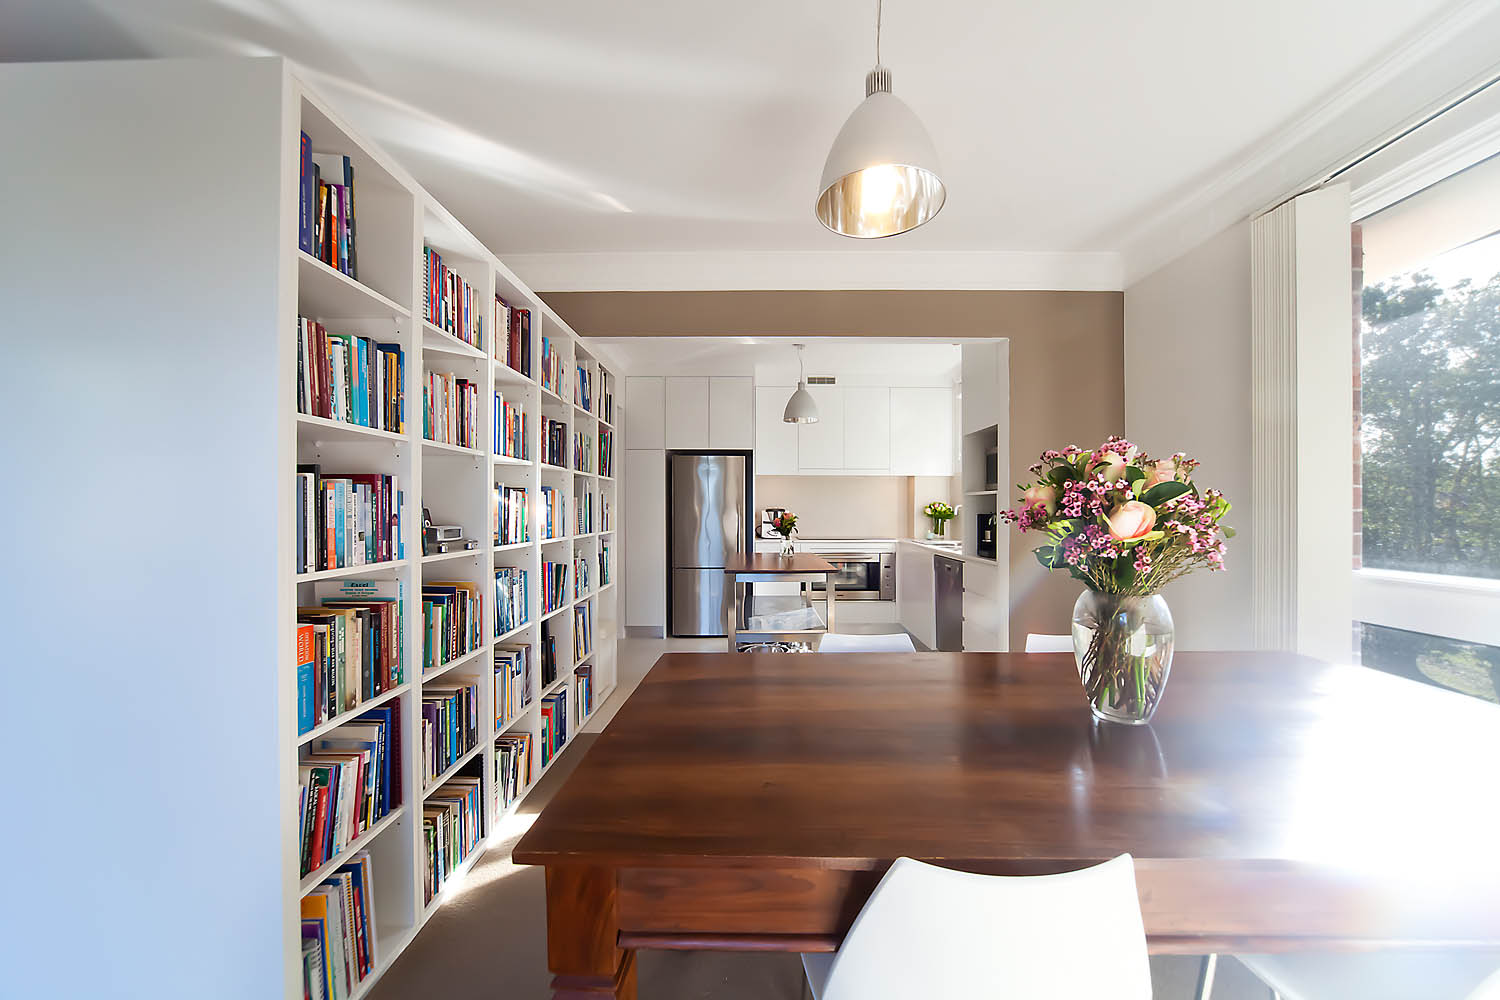
The modifications to the kitchen benefited the adjacent dining area and the living area. Each space had more daylight, had better cross ventilation and was easier to circulate through.

View from kitchen to dining.

view of kitchen

view of kitchen and dining showing double sided joinery. The joinery is 2.4m wide 2.1m high.

The kitchen layout is more open than previously and allows daylight deep into the living room. There is a 900mm wide oven good for catering for groups.
Kitchen
The island bench although small at 1200mm x 600mm was adequate to prepare meals around and include the family. For large gatherings the dining table was rotated to allow for a group of 20 to sit and stand around a central table / bench.
The kitchen cupboards utilised every space available. The above head cupboards went straight to the ceiling without bulkhead, the cupboard adjacent to the fridge was full depth, and there cupboards were built around a vertical riser at the corner, which although narrow was good for shallow storage. With a better budget, the pantry cupboard could have been pull out to improve storage for the deeper sections
The updated kitchen had a 900mm wide oven which could fit 4 large baking trays and was ideal for preparing meals for a young family, as well as hosting large gatherings. A refurbished induction stove top was sourced which was easy to clean and was good for all types of cooking.
The flooring and splashback is stone looking porcelain tiles, and matching mosaic tiles from Skheme. These tiles gave the appearance of a higher quality standard kitchen, with the cost and maintenance of porcelain.
Living room Joinery
The living room joinery was double sided and included open shelving, drawers and above head cupboards. The joinery provided privacy between the dining and living area without disrupting the circulation. It also accommodated for all the owners books and miscellaneous possessions, leaving the rest of the space clutter free. On the other side, the living room joinery integrated all the AV neatly into concealed grommets and also featured a concealed automatic retractable projector screen. A shelf was integrated into the opposite door opening, and AV setup to all for a projector.
Study Nook
The wall space adjacent to the kitchen was used as a study nook for two people. The wall space made good use of by fixed open shelving. The study nook was the depth of the adjacent opening and kitchen cabinetry and was a good position for quick touch down work. It was also good that the study desk was next to the fridge for snacking.
Words of advice for people considering your renovation or project?
Opportunities existing within your current envelope. Before looking for extensions or rebuilds, there are opportunities to improve layout, daylight, ventilation etc.
Check out our other posts on renovation: budget kitchen and converting your linen cupboard into a study nook
If you would like to work with home design edge on your own renovation, there is a renovation feasibility review available for a limited time.
Resources
- Kitchen joinery – custom
- Tiles – Skheme
- Benchtop – Casesar stone standard range
- Stovetop – Grays online
- Island Bench – ikea
- Pendant lights – ikea

free scheduling a Reno download

